Friday, June 27, 2008

May I take a moment to brag?

I just found out that I made the Finest Foodies Friday pick this week at The Leftover Queen! Yipee! Whee! If you are not familiar with her site, every Friday Jenn picks 5 blogs from the Foodie Blog Roll (closing in on 2000 blogs!) to feature. I mean, I am in pretty great company and was so surprised when I went to read about today's featured five and found my blog listed. She was very complimentary, and my thanks go out to her! Make sure you stop by the site and read about all five of her picks this week. They will have you drooling....

If you have a food blog and have not joined us yet, stop by and sign up. We have a really great forum and a fun Royal Foodie Joust every month. If you don't have a food blog you can still stop over and check out the forum as a guest. Jenn's blog is very interesting as well.

Thanks again, oh Queen, you really made my day!

Quick Lemon Lavender Fruit Turnovers


Here is a quick recipe to end the week. I thought this was a great way to use up the little bits of fruit in the fridge. You can vary the type of fruit and the juice used. The spices are measured in "pinches". Add some and adjust to your taste. Let the fruit macerate with the sugar and lemon juice while the oven heats and you roll out the pastry. Lovely with a dollop of Greek yogurt, ice cream or gobbling down the next morning on the way to yard sales, don't forget your coffee to go.


Quick Lemon Lavender Fruit Turnovers
makes 4, can easily be doubled

1 sheet of frozen puff pastry from a 17.25 oz box, thawed according to directions
1/3 cup chopped apricots
1/3 cup blueberries
1/3 cup pitted chopped cherries
1 tsp lemon juice
1/2 tsp lemon zest
pinch good cinnamon
pinch of ground ginger
pinch of dried lavender, finely chopped
1 tbl vanilla sugar
1 egg
1 tsp water
flour for dusting
vanilla sugar, or your choice of sugar to sprinkle on top


Preheat oven to 400 degrees.

Combine the fruit, lemon juice, lemon zest, spices, lavender and sugar and toss lightly. I measured all of my ingredients into a 2 cup Pyrex glass container, less cleanup. Let sit while you roll out the pastry.

On a lightly floured surface, roll the thawed puff pastry into a 12" x 12" square (or roughly that size). I used a ruler and paring knife to then cut the square into 4 equal squares.


At this point check to make sure the dough is not sticking to the work surface. Spoon the fruit mixture onto the center of the pastry squares, dividing into equal portions. Combine the egg with the 1 tbl water, mixing with a fork to create an egg wash. Dip your finger into the wash and run it along the 2 edges you will be sealing. Fold the dough to form a triangle and press the edges together lightly.


Transfer the triangles to a baking sheet lined with a silpat or parchment paper. Use a fork to press all the sealed edges together. Dust off any remaining flour with a dry pastry brush, then dip the brush into the egg wash and give the turnovers a nice light coating. Follow that with a generous sprinkle of sugar then cut 3 small slit in the top of each.


Pop these into the oven and bake for 17-20 minutes or until they are nice and golden brown and puffed. Let them cool in the pan, or serve warm from the oven

These freeze well and thaw quickly at room temperature. You can even drizzle a bit of glaze on them if you wish.

Thursday, June 26, 2008

Ina's Parmesan Chicken


It's the second Thursday of June, Good Morning and time for another Barefoot Bloggers post! This weeks recipe was chosen by fellow BB, Megan, at My Baking Adventures. Her choice was Ina's Parmesan Chicken. Now, those who know me know that I rarely cook with meat, but I have made this before and was happy to do so again. The key to this recipe is buying the best chicken and parm that you can. I believe that in this episode of Barefoot Contessa, Ina goes to a local chicken farm to pick up the breasts she will be preparing. I have no source for chicken that fresh, but the local grocer does carry a free range, organic product. However, I did serve fresh picked greens from my garden. In the show she is also preparing the dish for a "mystery guest" who turns out to be Mel Brooks. Well, in my case Mel failed to show, but the meal was terrific anyway. The great thing about parm chicken is that you can pound them out then flour, dip, bread and stack them between sheets of waxed paper earlier in the day. They cook up very quickly. I only made about a third of the chicken recipe, since there are only 2 of us, but made all the vinaigrette so I would have some on hand for another meal.

Easy peasy, enjoy!


Parmesan Chicken
serves 2

2 whole boneless, skinless chicken breasts
1/3 cup all-purpose flour
1/4 teaspoon kosher salt
1/4 teaspoon freshly ground black pepper
1 extra-large egg
1/2 tablespoon water
1/2 cup seasoned dry bread crumbs
1/3 cup freshly grated Parmesan, plus extra for serving
Unsalted butter
Good olive oil
Salad greens for 2, washed and spun dry
1 recipe Lemon Vinaigrette, recipe follows

Pound the chicken breasts until they are 1/4-inch thick. You can use either a meat mallet or a rolling pin. I placed a sheet of waxed paper on top and used a rolling pin.


They don't look so pretty, but here is the result.


Combine the flour, salt, and pepper on a dinner plate. On a second plate, beat the eggs with 1 tablespoon of water. On a third plate, combine the bread crumbs and 1/2 cup grated Parmesan.


Coat the chicken breasts on both sides with the flour mixture, then dip both sides into the egg mixture and dredge both sides in the bread-crumb mixture, pressing lightly.

At this point, I stacked mine on a plate with wax paper in between the layers and put them in the fridge until I was ready to cook them.


Heat 1 tablespoon of butter and 1 tablespoon of olive oil in a large saute pan and cook 2 or 3 chicken breasts on medium-low heat for 2 to 3 minutes on each side, until cooked through. Add more butter and oil and cook the rest of the chicken breasts (if they don't all fit in the pan ). Toss the salad greens with lemon vinaigrette. Place a mound of salad on each hot chicken breast. Serve with extra grated Parmesan.

Lemon Viniagrette:
1/4 cup freshly squeezed lemon juice (2 lemons)
1/2 cup good olive oil
1/2 teaspoon kosher salt
1/4 teaspoon freshly ground black pepper

In a small bowl, whisk together the lemon juice, olive oil, salt, and pepper. Done!

Stay tuned, next BB post, Thursday July, 10!

Wednesday, June 25, 2008

Apricot Ginger and Sugared Almond Frozen Yogurt

This recipe is my entry for the June Royal Foodie Joust at the Leftover Queen Forum, hosted by Jen. Last month's winner, Erin at The Skinny Gourmet chose apricot, ginger and butter as the ingredients to be used this month. You can go to the forum and see all the entries for this months challenge. We have until the first of July to post and then a few days to vote for the winner. The recipes entered every month are so diversified. My new ice cream machine was my inspiration this month. I wanted to have a salty, sweet, sour and cold treat, as well as try my hand at making frozen yogurt. The sweet and salty sugared almonds balance out the tartness of the yogurt and apricots. My recipe calls for vodka as the puree liquid for the fruit, but you could substitute any citrus juice. I found the recipe for the sugared almonds at About.com I went to Nutritiondata.com and entered the ingredients. For this recipe, serving 8 1/2 cup servings, the calories per serving are 162 with 3.5 grams of fat. Not only is this a tasty treat, it's also a healthier alternative to high fat ice cream. I also like the fact that I know what is going into my food and what is not, lots of chemical preservatives. I also used organic yogurt and milk. Wish me luck!

Apricot Ginger and Sugared Almond Frozen Yogurt

For the almonds

1 cup whole blanched almonds
1/2 cup sugar
2 tablespoons butter
1/2 teaspoon vanilla extract
3/4 teaspoon salt, I used Kosher Flake Salt

Heat almonds, sugar and butter in a heavy skillet over medium heat. Cook, stirring constantly, until almonds are toasted and sugar is a golden brown, about 15 minutes. At first the mixture will seem grainy, just keep stirring and it will come together. This is not the time to be doing anything else, keep with it. Remove from the heat and stir in vanilla. Spread on aluminum foil (I used my silpat); sprinkle with salt. Cool and break up into clusters. Chop about 1/2 cup into small pieces for the frozen yogurt and reserve the remainder for garnish.
Note: This stuff is addicting, hide it from all others or it will disappear!


For the yogurt

1 1/2 cup organic lowfat vanilla yogurt
1/2 cup organic whole milk
1/4 cup sugar
1/2 tsp ground ginger
2 cup chopped apricots (about 1/2 #)
1/4 cup vodka
1/2 cup chopped sugared almonds
1/2 cup diced apricot

Combine the yogurt, milk, sugar and ginger in a medium bowl or 4 cup glass measure. Stir to combine until the sugar has dissolved.

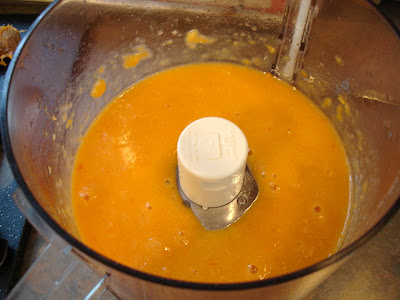
Puree the 2 cups of apricots and the vodka in the food processor.


Add the puree to the yogurt mixture and stir to combine well. At this point you can freeze according to the machine directions, or refrigerate until later.

When the mixture is about 5 minutes from being completely done in the machine, add the almonds and the 1/2 cup of diced apricots.

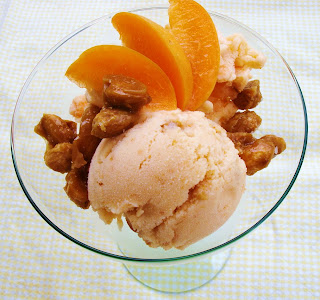
You can serve this right out of the machine as a very creamy, soft serve, or transfer to a container and freeze at least 1 hour. The frozen yogurt will need to sit out about 10-15 minutes after it has frozen hard to soften up enough to serve. Garnish with apricot slices and clusters of the sugared almonds!

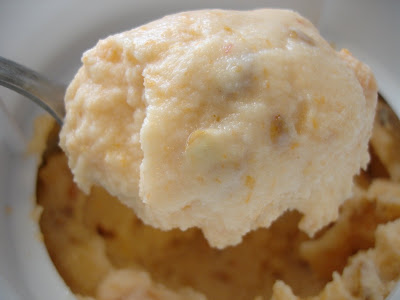
Nice soft and creamy out of the machine, don't you just want to lick your screen right now!

Tuesday, June 24, 2008

Strawberry Balsamic Jam with Lemon Lavender Buttermilk Scones

I did a web search for a balsamic jam recipe and found one on a blog titled Dinner Party. Remember all the strawberries I picked, well, they went into this jam. I found the recipe very easy to make and delicious! They suggested using pectin, which I did. I let my berries macerate in the sugar overnight as well. I was able to get four 8oz jars of jam and will make another batch with the berries I froze. To go with the jam I made scones from a recipe I adapted from Cooking Light. The lemon and lavender complimented the jam nicely.


Strawberry Balsamic Jam
Ingredients
2.2 lbs strawberries, washed, tops removed
4 3/4 cups sugar
2 tbs fruit pectin, half a package
3 tbsp lemon juice
4 tbsp balsamic vinegar

Place the strawberries and sugar in a non-reactive saucepan. Stir to combine, then cover and stand for a few hours. I put mine in a glass bowl to sit overnight in the fridge. Bring the berries out and let them come to room temperature before cooking.

Add the lemon juice, balsamic vinegar and pectin and bring to the boil. Boil for 15 to 20 minutes until setting point is reached. I had to cook mine much longer. To test for the setting point, have a plate chilling in the freezer. Place a few drops of jam on the chilled plate. If the drops form a "skin" and wrinkle a bit when touched, it is set. Skim off any foam and let the jam sit off the heat for 5 minutes. Pour into sterilized jars. Process 15 minutes in a boiling water canner.

For more canning tips go to Pick your own.org. You will find step by step instructions there.


Lemon Lavender Buttermilk Scones

Ingredients
3 cups cake flour
2 tablespoons sugar
2 teaspoons baking powder
1/2 teaspoon salt
1/4 cup chilled butter, cut into small pieces
3/4 cup low-fat buttermilk
1/2 tsp dried lavender, finely chopped
1 1/2 teaspoons grated lemon rind
1 tablespoon fresh lemon juice
1 teaspoon cake flour
1 large egg white, lightly beaten
1 teaspoon sugar (I used white sanding sugar)

Preheat oven to 350°.
Add the dried lavender to the buttermilk and stir to combine. Lightly spoon 3 cups flour into dry measuring cups; level with a knife. Place 3 cups flour, 2 tablespoons sugar, baking powder, and salt in a food processor; pulse 2 to 3 times or until combined. Add butter; pulse 10 times or until mixture resembles coarse meal. Add buttermilk mixture, rind, and lemon juice; pulse until just combined.


Scrape dough onto a lightly floured surface with a rubber spatula; sprinkle with 1 teaspoon flour (dough will be soft).
With floured hands, pat dough into a 4-inch circle; place on a baking sheet lined with parchment paper (I prefer a silpat). Pat dough into an 8-inch circle. Cut dough into 10 wedges, cutting into but not through dough.


Brush egg white over dough; sprinkle with 1 teaspoon sugar. Bake at 350° for 25 minutes or until golden. Cool on a wire rack.


This made for a lovely Sunday breakfast out on the patio in the garden!

Saturday, June 21, 2008

Strawberries Galore!

It's Strawberry season in my part of the world! I went to a u-pick farm this week and got a bit carried away. They were ripening in abundance. I managed to pick 14# of strawberries and 3# of fresh asparagus. Then I spent the better part of the week washing, hulling, slicing, freezing, jammin, baking, and whew, finally gelato making strawberries!


I will start with the gelato, well at least a version of gelato. I believe that most true gelato recipes call for whole milk, sugar, cornstarch and then the flavoring (fruit, chocolate, etc.). I wanted a lighter, less fat recipe and found one at Cooking Light. Lowfat buttermilk is substituted for the whole milk, resulting in only .8grams of fat per 1/2 cup serving! I decided to give it a try, but first, out to purchase an ice cream machine.


I have been wanting one of these babies since I can remember. When I was young, I have fond memories of our neighbors making homemade ice cream with an ice cream maker that everyone would take turns cranking. Man, I thought they had it all. What a luxury to make your own ice cream. I believe they made peach ice cream. Anyway, out to purchase my machine. I decided on the Cuisinart ICE-25 Classic Frozen Yogurt-Ice Cream & Sorbet Maker.


It will make 1.5 qt in 20-30 minutes and requires no salt or ice. Just
keep the insulated bowl in the freezer and you can prepare your own
frozen dessert or drinks anytime. What could be better!
I wanted to add a twist to mine, so I steeped some of my ginger mint plant in the sugar syrup. The taste in this batch was
not as strong as I would like, so next time around I will use
a bit more and steep it in the fridge overnight. One tip, have
your mix nice and cold before you put it in the machine for best
results.


This gelato is like a creamy sorbet. It is best if you put it
in the freezer for a few hours after making in the machine, then
let it sit on the counter about 10 minutes before serving.
The recipe makes enough for 2 batches. In the second batch I added broken up pieces of chocolate graham crackers and finely chopped fresh ginger mint about 5 minutes before the mixture was ready. Yum! Chocolate and strawberry! I have more strawberry related posts, but for now, here is the gelato recipe.

Strawberry Ginger Mint Buttermilk Gelato

Ingredients
2 cups sugar
2 cups water
handful of ginger mint
5 cups quartered strawberries (about 4 pints)
2 cups low-fat buttermilk

Preparation
Combine sugar and water in a large saucepan; bring to a boil, stirring until sugar dissolves. Add the ginger mint. Cover and let steep till cool or refrigerate overnight. Strain out the mint.Pour into a large bowl.


Place strawberries in a blender, and process until smooth (I put mine in the food processor and pulsed til they still had some small bits in the mix). Add strawberry purée and buttermilk to sugar syrup; stir to combine. At this point you will get the best results if you refrigerate the mixture.


Pour the strawberry mixture into the freezer can of an ice-cream freezer, and freeze according to the manufacturer's instructions. It took me 30 minutes. Transfer to a freezer container and chill at least 1 hour.

Yield
8 cups (serving size: 1/2 cup)
Nutritional Information (without the graham crackers)
CALORIES 134(5% from fat); FAT 0.8g (sat 0.3g,mono 0.2g,poly 0.1g); IRON 0.3mg; CHOLESTEROL 1mg; CALCIUM 48mg; CARBOHYDRATE 31.7g; SODIUM 17mg; PROTEIN 1.6g; FIBER 1.7g

Adapted from Cooking Light, JULY 2001


The finished product, ready for the freezer!


This is the ginger mint. I purchased the plant at Whole Foods.

Here it is with the chocolate graham crackers and fresh mint leaves!

Tuesday, June 17, 2008

Tarte Fine with Cherry Tomatoes

On a recent trip to the Mustard Seed Market & Cafe, I picked up a copy of "Sunny Season Flavors", published by Delicious Magazine. Every page is filled with beautiful photos and scrumptious recipes. I may try to cook my way through the entire thing! How hard could it be to work through 118 recipes this summer? I chose to begin with the Tarte Fine with Cherry Tomatoes, actually listed in the "starters" section. I paired it with a nice salad for our dinner. The recipe was great! Easy to follow and turned out beautifully. I made one small addition. I will be making this again, especially when my tomatoes begin to ripen. This would be nicely done with heirlooms and perhaps herbed goat cheese. They carry a whole wheat frozen puff pastry that I will pick up next time I get there (it's about 1 hour away!), for a healthier option as well. I am not adventurous enough to make my own, yet. If you have an pointers or tips for making puff pastry, feel free to comment!

Tarte Fine with Cherry Tomatoes
serves 4

1/2 package (from 17.5 oz frozen puff pastry, 1 sheet)
7 oz goat's feta (or soft goat's cheese)(I used the President's Crumbled Feta)
1 tbs. chopped chives
1 tbs. chopped thyme
1/2 tsp chopped rosemary (my addition)
8 oz cherry tomatoes, halved
2 tbs. olive oil
1 tsp granulated sugar
1 egg, beaten
3 tbs. grated Parmesan (I used shaved, and a bit more)

Preheat oven to 375 degrees. Line a baking sheet with parchment paper. I would suggest using a rimmed baking sheet, just in case the tomatoes leak out. I cut the paper to fit the sheet, then took it out to roll the pastry on.

Thaw one pastry sheet according to package instructions, in my case 40 minutes. Unfold pastry on lightly floured parchment paper ( the same one cut to fit the pan). Roll pastry into a 12" x 10" rectangle. If there are any cracks in the pastry, sprinkle with water and press together. Fold in the edges of the pastry to make a border, pinching the edges together. Prick the pastry base with a fork, place back in the baking sheet and refrigerate for 30 minutes.

Mash the feta (best at room temperature) with the herbs, then spread over the pastry base. I found the best way to do this was with my fingers. I could not get it to "spread".

Place the tomatoes, cut-side up, over the feta. Drizzle with oil and sprinkle with sugar. Season with salt and pepper. Brush pastry edges with the beaten egg.

Bake for 10 minutes. Sprinkle with Parmesan, then return to the oven and continue baking 10-15 minutes or until tomatoes brown lightly.

I served this with a salad of sweet baby greens with a few leaves of basil tossed in, sliced roasted beets, a few pine nuts, crumbles of goat cheese and raspberry vinaigrette!

Saturday, June 14, 2008

My first little harvest, Quick Cucumber Bites and a killer Vodka Mojito!

My radishes are here, my radishes are here, I'm somebody!

Okay, well, maybe that's a bit over to top, but i did dig my first little babies last night. I always put in tomatoes and herbs, but it has been years since I branched out to other veggies. Pictured are my watermelon radishes, lemon thyme, mint and farmer's market blend lettuce. I gave them all a good rinse and scrubbing and started our meal. Oh, by the way, seems that kitties LOVE the lettuce mix, I kept busting one of mine stealing leaves behind my back! Who knew?

I used the radishes to make a quick appetizer to have with a well deserved Friday Night Cocktail. I'm not posting an official recipe. This is one of those "wing it" type things.

Cucumber Bites
serves 2

Slice 2 watermelon radishes into 8 slices. Using a peeler, slice strips of the cucumber peel making a nice green and white stripe pattern. Then cut 8 slices, about 1/4" thick. Put about 2" of a log of room temp. goat cheese in a small bowl. Add to the cheese a few finely chopped sprigs of lemon thyme and a bit of sea salt and finely ground pepper. Form the cheese into 8 little balls.

To assemble, lay the cucumber wheel flat, center the cheese ball on it, and then place the radish slice on top, pressing down lightly. That's it! You can make these ahead and place them in the fridge to chill, I think they taste better with a chill to them.


I had to post 2 pics, aren't they pretty?


For our Friday Night Cocktail, I made a "version" of a Mojito. Let me tell you, they hit the spot!


Rosemary Vodka "Mojitos"
serves 1

Place a generous amount, I used three, 6" sprigs of fresh mint, in the bottom of a rocks glass. Add the juice of 1/4 lemon, about 2 tbls. or so. Muddle the two with a muddler, if you have one, or you can use a wooden spoon like I did to break up the mint leaves. You want them to have that chopped up consistency. Then add cracked ice, 1/2 shot of rosemary simple syrup (from the Rosemary Rita blog post), 1 1/2 shots of vodka ( I like Pinnacle) and them give it a quick stir to combine.

Sanitas bona !


Note: as for the main course, well you'll have to check back. I will be posting it on the 26th. Believe me, it will be worth checking in on!

Friday, June 13, 2008

Farewell Tastespotting :o(

As of today, one of my favorite food sites has been shut down, kaput, no more, nada, bye-bye. It must be a cruel Friday the 13th Prank, yeah, that's it.

Anyway, for those of you that are fellow TS addicts, I know you feel my pain. For those of you who never surfed it's tasty pages, I pity you. TS was a great place to promote your blog, find ALL kinds of recipe inspirations, see what fellow food bloggers are up to, and let's face it, quench that food porn addiction.

The rumor on the net is that the legal issues had to do with bloggers that posted pictures from other sites on TS and their own blogs, presenting them as if they were the originators of the work. That's all I have been able to come up with. I only posted my own work, and I believe that most others did as well. You know what they say, "only takes 1 bad apple", blah, blah, blah.

If anyone out there knows of a good alternative to Tastespotting, or has the guts to start a site of their own, let me know!

As for now, Tastespotting.com, R.I.P..........

Thursday, June 12, 2008

Pasta, Pesto and Peas


Okay, so what does this picture have to do with the title of this post? It's my new badge (if you will) that from hence forth will signify that you, the reader, are entering the "Ina Zone". Seriously, I have joined a fun new group of bloggers, the Barefoot Bloggers, a group dedicated to the Queen of the Kitchen, The Barefoot Contessa herself, Ina Garten. On a bi-monthly basis, the second and fourth Thursday of the month, I will be recreating and posting one of Ina's recipes which have been chosen at random, from a fellow BB. I wanted to have some more fun with this (I mean creating and eating any of Ina's recipes is in itself a pleasure) so I came up with this badge. What a great excuse for a pedicure! If anyone is in my area and wants to recreate these great toes, please, go see Tony Vo at French Nails & Spa. He's a great nail artist, don't you agree! Thanks for the great work Tony!
I may switch the pics of my polished peds out a bit, I took a series at the beach this a.m. Anyway, on with the first of many recipes! I am presenting the version I made and at the end will provide a link to the original.


Pasta, Pesto and Peas

3/4 pound Barilla mini fusilli
3/4 pound Barilla bow tie pasta
1/4 cup good olive oil, plus a little more to drizzle at the end
1 1/2 cups pesto, I used 1/2 cup that I had made last fall and froze and 1 cup of Christopher Ranch bottled
1 (10-ounce) package frozen chopped spinach, defrosted and squeezed dry
3 tablespoons freshly squeezed lemon juice
1 cup Kraft Light Mayo with Olive Oil
1/2 cup freshly grated Parmesan
1 1/2 cups frozen peas, defrosted
1/3 cup pignolis (pine nuts)
3/4 teaspoon sea salt , or to taste
3/4 teaspoon freshly ground black pepper, or to taste


In a large pot of boiling salted water I first cooked the bowties. When they were just al dente I removed them with a spider, drained them in the colander and tossed them with half of the olive oil. Then, in the same pot, I cooked the fusilli til al dente, drained and tossed it in the same large bowl, adding the rest of the olive oil. This recipe makes quite a bit, so having a large enough bowl is a bonus. Cool to room temperature.


In the bowl of a food processor fitted with a steel blade, puree the pesto, spinach, and lemon juice. Add the mayonnaise to the puree. Add the pesto mixture to the cooled pasta and then add the Parmesan, peas, pignolis, salt and pepper. Mix well, season to taste, and add a bit more olive oil if you feel it needs to be loosened up at all. Serve at room temperature or chilled. Either way it is delicious!

Here is the link to Ina's original recipe. I just made a few changes, mainly not making all the pesto. My basil is just starting to grow so I did not have enough to cut and, frankly, the price at the store is not cost effective. I served this the first night with some sweet onion, portobella and golden sweet pepper that were grilled. Great on a warm night! Enjoy!


Stay tuned for the next BB!

Wednesday, June 4, 2008

Egg Salad for 2


Recently I came across a new product from Kraft, at least it's new to me, Mayo with Olive Oil. Now that the weather is getting warmer and the time has come to don lighter and less clothing, reduced fat anything sounds good. The problem with this stuff is that the lighter fat products have some funky tastes. The mayo was on sale, I like the way the ingredients read and also the fact that the product has a Sensible Solutions tag on it, signifying a healthy alternative to whole fat or even homemade (truly the best) mayo.

I tried it straight from the container (I also like the nice wide opening), and I have to say, it's not bad, in fact, surprisingly good! A little sweet and a little tangy. Now, what to use it with?

Egg Salad! Just in time for lunch with the other half. Here's the quick recipe.

3 hard cooked peeled eggs
2 radishes, I used easter egg
3 petite sweet pickles
3 tbls. mayo
a few sprigs of lemon thyme
s & p to taste
4 cups spring mix greens

Chop the eggs, finely dice the radishes and pickles. Toss in the mayo and thyme and, using a fork, toss and mash lightly at the same time. Season to taste, chill and serve atop greens.


I garnished the plates with a bit of flat leaf parsley and sliced campari tomatoes. The iced tea is Vanilla Rose Decaf by Celestial Seasonings, brewed with a bit of vanilla sugar added and then chilled.

If my calculations are correct, each serving is about 215 calories! Yea! And so yummy. Next week my little lettuce crop in the back will be ready for cutting, better stock up on eggs.

Important Note: Do yourself a favor and purchase the cage-free organic eggs. They are a bit pricey but taste better and every purchase is a vote and a step towards not supporting the awful commercial, gross egg farms. Better yet, find a local farm to buy from if you can!

Sunday, June 1, 2008

R & R Vodkaritas


This heavenly concoction is my entry for May's Royal Food Joust, hosted by Jenn at the Leftover Queen Forum. The three ingredients required for this month's Joust were; raspberries, almonds and lime, in any form. I have been sitting on my entry idea all month, waiting for a nice warm day to enjoy these. Well, as you can see, time and good old mother nature weren't quite in sinc and I am just getting this entry in under the wire. Yesterday the neighbors announced there was to be an impromptu cookout, and I jumped on the opportunity to bring this cocktail. What a hit they were! The R&R Vodkaritas are both sweet and tart at the same time. Someone described it as an adult "bomb pop"(remember that frozen treat from your past). The two "R's", in this instance, stand for Raspberry and Rosemary. The Raspberry "Rita" is full of pureed raspberries, gets a nice twist with a few drops of almond extract and is a bit on the tart side. The Rosemary "Rita" is made of a simple syrup infused with fresh rosemary and fresh lime juice, but still is a bit on the sweet side, balancing the drink nicely. I chose to make these traditional tequila frozen drinks with vodka to make them more unique.

One of the beauties of this drink is that it can be put together in advance and then just whirred in the blender with ice at the last minute. I made the rosemary syrup a week in advance and pureed the raspberries the day of the party. To transport, I mixed the two separate "Rita's" sans ice, and put them in their own containers, had the skewers wrapped in a damp paper towel, grabbed the ice and out the door! When I arrived at the party, I skewered the raspberries for the garnish then made the Raspberry "Rita" which was poured into a pitcher and placed in the freezer while the Rosemary "Rita" was whirred in ice. Then just pour half and half in the glass, swirl with a stir stick or other utensil, garnish and serve.

The R&R Vodkaritas were a hit, and were requested for the next get together. I can't wait!

R&R Vodkaritas
serves about 12 generous drinks

for the Raspberry Rita:
2 cups raspberry puree
6 oz Vodka (I like Pinnacle)
1/2 cup fresh squeezed lemon juice
2 tsp superfine sugar
1/2 cup triple sec
3/4 tsp almond extract
about 6 cups or so of ice to get that frozen consistency

To make the puree, add fresh or frozen (thawed) raspberries to the food processor and process till smooth. Then run through a fine sieve, pushing with the flat side of a rubber spatula to rid the puree of the seed. Combine puree and all ingredient in a blender til it is a nice frozen drink consistency. I did half at a time to make 6 drinks and that is also what the blender would hold.


for the Rosemary Rita:

1 cup rosemary simple syrup
1/2 cup fresh squeezed lime juice
8 oz vodka
same amount of ice as above

To make the rosemary syrup, add 1 cup sugar and 1 cup water to a heavy small saucepan. Heat on medium, stirring, until the sugar has dissolved. Remove from the heat, pour into a mason jar or heat proof jar and add 2 sprigs of fresh rosemary about 5" long and seal the jar. When it has cooled to room temperature, place in the fridge for 2 days to infuse. After 2 days, strain the syrup into a clean jar and keep in the fridge. When ready to make the drinks, combine all the ingredients and follow the same steps as listed above.
Enjoy!