Thursday, May 29, 2008

Banana Mango Bread

The new coffeemaker has arrived! After researching via the internet we purchased a Cuisinart Brew Central . It fit our coffee needs, price and style categories, and, I got it for 20% off at Bed Bath and Beyond with a coupon from a magazine! To launch it in style, I baked a loaf of Banana Mango Bread. The original recipe is from a Cooking Light recipe. I made a few changes to come up with a lowfat alternative with a great mango twist (I think I am still stuck on mango from the past food challenges). The coffeemaker brewed a terrific cup, the bread was moist and spicy and the morning was clear and warm. What a great start to our day!

Mango Banana Bread

1 cup all purpose flour
1 cup white whole wheat flour
3/4 tsp baking soda
1/2 tsp salt
1/2 cup sugar
1/2 cup packed brown sugar
1/4 cup applesauce
1 tbsp canola oil
2 large eggs
2 ripe bananas
1 mango
1/3 cup 0% fat greek yogurt
1/2 tsp ground cardamom


Preheat oven to 350°.

Lightly spoon flour into dry measuring cups, and level with a knife. Combine the flours, baking soda, and salt, stirring with a whisk.

Place sugars, applesauce and oil in a large bowl, and beat with a mixer at medium speed until well blended (about 1 minute) This is what the recipe called for, I just used a whisk because I was too lazy to pull out the mixer. Add the eggs, 1 at a time, beating well after each addition.
Place the banana and mango in a food processor and pulse to a rough puree (you could just mash the banana and dice the mango if you wish). Add banana mango mixture, sour cream, and cardamom to the sugar-egg bowl; beat or stir until blended. Add flour mixture; beat at low speed or stir in just until moist. Spoon batter into a 9 x 5-inch loaf pan (my pan was a tad smaller) coated with cooking spray.

Bake at 350° for 1 hour or until a wooden pick inserted in center comes out clean. The side should begin to pull away and a nice crack will develop on the top. Cool 10 minutes in pan on a wire rack; remove from pan. Cool bread completely on wire rack (if you can wait that long).

I served it with a bit of light cream cheese on top, I mean it was the weekend.

Saturday, May 17, 2008

Ode to a French Press


Okay, so you know how you have that gadget or piece of kitchen equipment that has been collecting dust? You see the same item at a garage sale or thrift store and think, "I have that, when was the last time I touched/saw it? Will I ever use it again? Maybe I should donate or sell mine?" I mean this is the time when living simply is "in".

Such is the case with my French Press. It has been moved to 4 different addresses since last used. It has sat, patiently waiting to be put back into service.

The brief history of my press. I purchased it about 8 years ago when I became a single gal through divorce. I had a cute little studio apartment with a small kitchen, including, as my friends dubbed it, the "barbie doll stove". Having limited space, and just making morning joe for myself, I purchased my press. It is the perfect hip, single gal kitchen accoutrement. I used my press every morning, religiously. Then, as luck would have it, I met my guy, we began cohabitation, purchased "the coffeemaker", and old pressy was retired.

This week, the Krups died. It was slow coming. First the water would appear on the countertop, then the off and on stopping of the brew cycle, the culmination, or last dying breath was when the other half walked in to discover a strange version of our kitchen being converted into a steam room. All we needed were the towels and slippers. I have spent the last two days researching a replacement on the internet. With the rising price of gas and the fact that calling a store, getting a live body on the other end and letting my "fingers do the walking" no longer is a choice, I turn to my trusty computer. I believe we will be out and about tonight or tomorrow to hunt down and purchase our prize.

The promise of a future, new maker did not answer the first question on my mind this a.m., when I awoke thinking, ugh, where will I get my coffee? Then I remembered pressy. I got him out, dusted him off, and began the preparation of the cup o' joe. For a great set of instructions on brewing the perfect cup, go to ehow.com. I found this site to be the most thorough explanation.

My cup of coffee was everything I hoped for. Rich, warm and smooth. I savoured every drop while watching Michael and Giada whip up some yummy grub, my version of Saturday morning cartoons. For one brief moment I was that hip, single gal (nice, but not as great as happy, spoken for gal).

So, to my faithful friend pressy, not to fear. You will never be that gadget that ends up at the Goodwill or yard sale table. I know when then need arises, you will be there.

For this I say, "Thank you, my friend".

Friday, May 16, 2008

Spring Shortbread, a Tale of 2 Cookies


For Mother's Day this year, I chose to make these cookies as a gift for my surrogate mother. I wanted a gift that would be fitting for the season, delicious and easy to ship. With the cost of everything going up, I look for light-weight gifts. I felt that shortbread cookies would be a great vehicle for the flavors I had in mind. Wandering around the Internet, I found 2 recipes that I thought looked good, and decided to put them to the test. The results were, Rosewater-Green Tea Butterflies and Lavender-Lemon Wheels. The Butterflies are an adaptation of a Cooking Light Chai Shortbread recipe, and the Lavender-Lemon wheels I found on Food and Wine. Of the 2, I was happy with the recipe from Cooking Light. The cookies were light, delicate and kept their shape when baked. On the other hand, the Lavender cookies spread too much and quickly over baked. Although they tasted great, I wasn't happy with the way they baked off. I experimented with rosewater for the first time, and am not sure if I added enough. I will be making more in the near future and will up the amount I use. If anyone has a suggestion, please leave me a comment. I think I tasted it, at least I feel that it enhanced the sweetness of the cookie. Needless to say, baking both in the same day, my house smelled like a garden! One thing great about this cookie, like many others, the dough can be made ahead of time, which is what I did.
To send, I lined the bottom of a cake box with a bit of crunched up wax paper, put a pretty piece of pink tissue, then wrapped each group of cookies in wax paper, so the flavors would stay separated from one another. The box was tied with a nice pink check ribbon, and I tucked in a few bags of jasmine tea, to be enjoyed with the shortbread.


Rosewater-Green Tea Butterflies

makes about 20 cookies

1 1/2 cups all-purpose flour
1/8 teaspoon salt
1 tsp green tea
3/4 cup powdered sugar
10 tablespoon butter, softened
3 tsp rosewater
white sanding sugar

Lightly spoon flour into dry measuring cups; level with a knife. Combine flour, salt and green tea lightly with a whisk.


Place sugar and butter in a medium bowl; beat with a mixer at medium speed until light and fluffy. Gradually add flour mixture to butter mixture, beating at low speed just until combined (mixture will appear crumbly). Sprinkle dough with rosewater; toss with a fork. Handle the dough lightly and as little as possible. Place the dough on plastic wrap, form into a disc and wrap. Chill 1 hour or until very firm.


Preheat oven to 375°.
Unwrap dough and place on a lightly floured surface. Gingerly roll the dough out to about 1/4" and cut out with a cutter dipped in flour. Place butterflies on baking sheets lined with parchment paper. Place back in the fridge for 20-30 minutes to chill. Sprinkle with sanding sugar before baking.


Bake at 375° for about 12 minutes or until just lightly brown on the edges. I sprinkled the cookies lightly with sugar again. Cool on pans 5 minutes. Remove cookies from pans; cool completely on wire racks.


I love this brand of green tea. Try it in one of your recipes!


Lavender-Lemon Wheels
makes about 1 1/2 dozen


1/3 cup sugar
1 teaspoon dried lavender blossoms, chopped
1 teaspoon finely grated lemon zest
1 stick (4 ounces) unsalted butter, softened
1 cup all-purpose flour
1/2 teaspoon salt
purple sanding sugar


In a medium bowl, mix the sugar with the chopped lavender and grated lemon zest. Using a handheld electric mixer, beat in the butter at moderate speed. At low speed, beat in the flour and salt until a soft dough forms. Transfer the dough to a sheet of wax paper and refrigerate for 20 minutes. Place some sanding sugar on a piece of wax paper. Form the dough into a 4-inch log, roll in the sanding sugar to coat, re wrap in wax paper and chill for at least 45 minutes longer.


Preheat the oven to 350°. Slice the shortbread dough into 1/4-inch-thick rounds and place the rounds on ungreased baking sheets, I used parchment paper. Freeze the rounds for 10 minutes.
The original recipe calls for baking the shortbread for 20 to 25 minutes, ,I baked mine about 18 minutes, or until the edges are lightly browned. Transfer the baked shortbread to a wire rack to cool completely.

Friday, May 9, 2008

Tres Leches Cake with Dulce de Leche


This combination give the phrase "Milk your diet" a whole new meaning! I was invited to celebrate Cinco de Mayo with a few of my neighbors. The host made the main course dishes, others contributed with an array of salads and appetizers. I volunteered the dessert. The reason being, I saw the "Good Eats" episode a while back where Alton made the Tres Leches Cake, and had never heard, seen or tasted one. It looked so delicious that I have been obsessed, well maybe just a tad, about this cake. I did a pretty long search on the net for recipes, there are many! I decided on this one from Cottage Living. I liked the look of the cake, the Chef's background and the addition of the dulce de leche. The cake received raves reviews, is very simple to make, and is almost like cake and pudding in one. There are many ways to make the dulce de leche(you can jump here to wikipedia for more info), a caramel like milk sauce. I was a bit afraid for the method where a can of sweetened condensed milk is boiled on the stove, I had visions of installing a new kitchen. I opted for the CIA's version, how could I go wrong with this one? It was a great choice. The sauce is not one for the impatient, it takes hours, but oh the aroma! My house smelled like sweet warm milk all day. Drizzle your dulce de leche on toast, yogurt, cookies, I mean the possibilities are endless. I give this combo 5 stars and can't wait until the next excuse, I mean occasion to make this.

Tres Leches Cake
serves 15
1/2 cup unsalted butter
1 cup sugar (I used my vanilla sugar)
5 large eggs
1 tsp. vanilla extract, divided
1 1 /2 cups all purpose flour
1 1/2 tsp baking powder
1 cup whole milk
1 (14oz)can sweetened condensed milk
1 (12oz) can evaporated milk
1 1/2 cups whipping cream
1/4 cup powdered sugar


Preheat oven to 350 degrees. Grease and flour a 13 x 9 baking pan.

Beat butter and sugar at medium speed with an electric mixer until fluffy; mix in eggs and 1/2 teaspoon vanilla. Combine flour and baking powder; add gradually to butter mixture, stirring to blend. Pour batter into prepared dish, and bake at 350° for 30 minutes or until wooden pick inserted in center comes out clean. Pierce cake while warm, with a wooden skewer or fork all over.
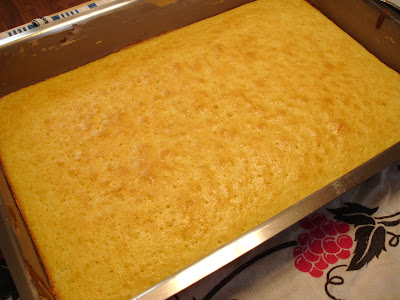
Combine the 3 milks, and pour on top of the still warm cake; cool to room temperature. Cover and refrigerate until well chilled, at least 4 hours or overnight. I think it is best if left overnight.


When ready to serve, beat whipping cream, powdered sugar, and remaining vanilla at medium-high speed with an electric mixer until thick; spread over cake, drizzle with dulce de leche and serve. The cake can sit out a bit at room temperature, but should have a slight chill to it.


Dulce de Leche
makes 1 cup

1 quart whole milk
1 cup sugar
cinnamon stick, two-inch piece
1/2 teaspoon baking soda
2 tablespoons water


Place the milk, sugar and cinnamon stick in a large, heavy-bottomed saucepan over medium heat. Stir to dissolve the sugar, while heating the milk to a gentle simmer. The milk will begin to form a foamy layer across the surface and around the perimeter of the pan. Stir the mixture gently to incorporate.

Dissolve the baking soda in the water. Stir the baking soda mixture into the milk mixture. It will foam up quite a bit, just keep stirring, gently.Reduce the heat to low and cook the mixture uncovered at a low simmer, just so the milk's surface breaks with a gentle roll.
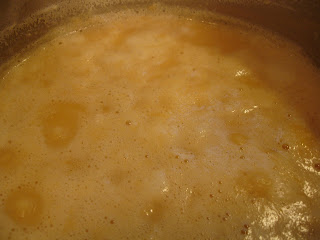


Check the mixture periodically and gently stir without incorporating the foamy layer that forms across the surface.

After the mixture has been simmering for 1 hour, remove the cinnamon stick. The milk mixture will begin to turn a light tan color. Continue simmering until the mixture reduces to the thickness of sweetened condensed milk, takes on a rich tan color and has reduced to about one cup, about 1 to 1-1/2 additional hours. The mixture will thicken further as it cools and under refrigeration.

Strain the mixture immediately into a jar, using a fine mesh strainer. Cool completely. Refrigerate for up to 3 weeks but I doubt it will be around that long!


Just one more picture of my proud moment!
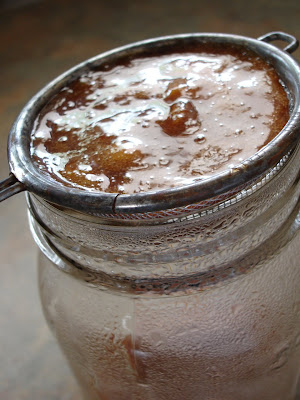


A sample of our great spread!

Thursday, May 8, 2008

Buffalo Mango Shrimp with Mango Lime Cream Dipping Sauce

Wow, I have a back log of posts to get to . The pictures are ready and waiting. I have been spending time outside in the garden and didn't realize how far behind I was. So let's get to it!

This recipe is as good, well, even better than it looks! I adapted this from a recipe by Elle. You can see the original recipe on her blog, Elle's New England Kitchen. Her recipe was created for chicken wings. We really try to avoid eating chicken, so I adapted it for shrimp. This was her Winning entry for the May Royal Foodie Joust, and she is well deserving of first place. The three ingredients required were mango, brown sugar and cardamon. Congratulation Elle, and thanks for the inspiration! We really gobbled these up (while watching the Cavs win!) and I think they are a delicious healthy take on bar munchies.


Here is the recipe as I made it. I found some great wild caught Florida Gulf Shrimp, not frozen and purchased a pound. I think they were 16-20s. The shrimp was served with the sauce, plenty of celery sticks to dip with and oven sweet potato "fries". To make the fries, preheat the oven to 400 degrees. I line a rimmed cookie sheet with foil, easier to clean up. Peel the potato, slice lengthwise into even sticks, lightly drizzle with olive oil then sprinkle with sea salt and coarsely ground pepper. Then, I give them an extra kick with a generous shake of Emeril's Essence. Pop them in the oven for about 30 minutes, turning once. I let them sit out, loosely covered while the shrimp cooked, but you could cook both at the same time.

Buffalo Mango Shrimp with Mango Lime Cream Dipping Sauce
serve 2 dinner portions

1 pound shrimp, cleaned, shell removed, tail intact
1 cup flour
1/2 tsp garlic powder
1/2tsp salt
pinch of cardamom
1/2 cup Frank's Hot Sauce
1/2 cup pureed Mango
1/4 cup canola oil

Preheat oven to 400 degrees. Place the flour and spices in a ziplock bag. Combine the wet ingredients in a medium bowl. Place the shrimp (make sure you pat them dry) in the bag and shake to coat. Remove from the bag and place on a plate. Put the shrimp in the fridge for about 30 minutes to chill. Then, put the shrimp about 6 at a time in the sauce to coat. Place them on the prepared sheet and cook about 12-15 minutes, or until just done, turning once. Serve while hot!
Mango Lime Cream Dipping Sauce

1 1/2 cups pureed mango
1/2 cup sour cream (I used the light)
zest of 1 lime
juice of 1/2 a lime
2 tsp brown sugar
3/8 tsp cardamom

Combine all ingredients in the food processor, or whisk together until blended. Refrigerate until ready to serve.

Friday, May 2, 2008

Thanks out to Maggie and Rosemary Scallops


Thanks go out to Maggie at Dog Hill Kitchen for giving my blog an Excellent rating. My turn is to now rate 10 others that I feel deserve the same. I am only featuring 4 at this time. Partly because I haven't really been blogging that long, and have not had the time to connect with that many other foodies and also because I previously picked 6 of my faves for the meme (see post). If they received this award in the past, then I am sure they deserve another!


First up is Leah's blog, Spicy Salty Sweet, I think the name says it all. What caught my attention was the post on Strawberry Preserves with Black Pepper and Balsamic Vinegar. I can't wait for the local berries to come in season so I can test drive this recipe.

Sweets by Sarah another winner. I mean, how great is it when someone has pics of her cat and homemade pop tarts? Pretty great in my book! Hey Sarah, Welcome to Food Buzz!

You will want to dive into the pictures on La Mia Cucina , 'nuff said!

Brittany's May entry, Little Mango Pies with Brown Sugar Grand Marnier Ice Cream, for the Royal Foodie Joust was yummy! You can check it out at The Pie Lady.

I hope you can visit these blogs. I think they are all worthy of the rating.

Sorry I haven't posted much in the last week or so, lots going on. The spring weather has got my green thumb going. I have seedlings going in my basement "greenhouse"; lemon cucs, many different heirloom tomatoes, basil, cilantro and nasturtium. So far they are looking pretty good. This is my first attempt at starting them indoors like I have. I will be posting a future blog on them. Outside, I have put in some beets, radishes and lettuces. Can't wait to get cooking with them!

In the meantime, here is a quickie!


Rosemary-Grilled Scallops

I used 8 nice sized fresh scallops that weighed just under 1#. Slice lengthwise, 4 very thin pieces of prosciutto, strip off the leaves of 8 rosemary stems (long enough to skewer the scallops), have some olive oil, lemon juice, salt and pepper at the ready.

Wrap the scallops edges with the prosciutto and skewer with the rosemary. Give them a light rub of olive oil, a drizzle of lemon juice, and a sprinkle of salt and pepper. Let them sit for about 15 minutes while the grill heats up.

Place them on an oiled, well heated grill and cook about 3-4 minutes per side (this will depend on the thickness of the scallops). until they are just opaque and a bit firm to the touch. Serve them up right away.

This is enough for 2 serving, 4 apiece as a main course.

A few notes: I found the recipe online here. We both gave it 2+ thumbs up. Very delicious and simple! I used a great bottled lemon juice, Italian Volcano, that I found at Costco. It is a great product to have on hand, they use 100% organic lemon juice and it is a fraction of the cost of fresh, especially as much as lemons are now. I also used kosher flake salt from Trader Joe's, and very sparingly. I think the prosciutto is salty enough. Most of the rosemary leaves will burn off while cooking. I did not soak mine before using, that may help some. Maybe I will try that in the future.


I love this picture with the flower!